
A WildEats perspective on achieving the maximum potential
for all your wild game harvests
Having this knowledge and understanding WILL Give you better results from your ALL your Wild Game Dishes
PERIOD
Many things come into play when dealing with your hard earned wild game harvests...including many aspects that have always been someone else's concern. Well, if you want your treasured wild game meat to live to its potential...those aspects NEED to become your concern as well. Here is a collection of potential pitfalls that can have a negative impact on the quality of the meat in your freezer. Understand these details and the results will be quite evident...at your table.
Passion runs very deep in the hearts of us who crave the autumn ritual of heading to the hills in search of nature’s bounty. The sights, smells and feel of an early morning sunrise are hard to equal. I’ve been fortunate enough to have an equal passion in what takes place after a successful hunting trip- the culinary result from all that hard work.
These passions have been apart of humane survival from the beginning of time and unfortunately there are many that have never experienced a piece of wild game meat for what it really can be. Understanding what happens to our meat products from the field to the feast is an important step towards building superior links.
LINK I
Marksmanship (shot selection)/ Slaughter House Mentality
In slaughterhouses across the country the ultimate goal is to humanely dispatch the animal of choice without subjecting it to stress. This is done a number of ways including the use of a stun gun. The animal is kept very calm and is basically knocked unconscious without ever knowing what is about to happen. Under these conditions the muscle structure never gets a chance to develop adrenaline or the endorphins associated with undo stress or trauma. Adrenaline and the chemical reaction that occurs when an animal is under these conditions cause the muscle tissue to swell and become almost impossible to tenderize. This same situation often happens during the rut, but that’s a self-induced state of adrenaline.
Not long ago I was given some moose meat that was harvested at the peak of the rut. I was told it was pretty tough and my buddy wanted to see if I could get better results than he was getting. I tried dry aging it for a couple of weeks. After trimming off all the dried outer edges I noticed that I could visibly see the swollen sections of the muscle tissue. Each grain of muscle literally stuck out like someone or something pumped it up. All the dry aging in the world wasn’t going to breakdown that muscle.
An animal that is immediately dispatched will have much better table value than one that endures trauma and stress, even if it’s self-inflicted. So, the first step to a solid beginning “link” actually has nothing to do with cooking, it’s all about shot placement. Making a shot selection that will dispatch an animal in the same fashion as in a slaughterhouse environment WILL give you the greatest chance to reach the maximum result.
Accuracy, Shot Selection and Patients are the first steps to getting the most out of your meat
Of course there are other issues that have an effect on the quality of wild game meat and they include-
Age of the Animal - Older animals simply have muscles that are more developed.
Health – A free ranging animal has many obstacles throughout its life that effect it over all health. If you notice an animal that isn’t physically acting right you may want to consider selecting one that is.
Rut – The rut effects the quality of the meat by filling it with adrenaline and the endorphins that come with the physical vigor’s of combating for the right to breed. Not to mention the possible cross contamination potential from all the components of an active wallow!
Weather/Diet – And last but not least the seasonal weather is so important as it controls how much and what groceries these animals have throughout the year. All of which play an important part in their overall health and the quality of their meat.
Once THAT shot has landed there's NO going back. Make it a good one.
LINK II
Environmental Cleanliness
“Cross Contamination” is a term used by the Department of Public Health describing when a physical/tangible item is spread to another physical or tangible item. This term is general associated with contaminates that have the potential to induce bacterial, viral or microorganism infestation. When dealing with wild game animals we all need to be concerned with the potential of all of these possibilities. Without getting into a biological discussion, simply understanding how to avoid such a circumstances will help you, not only prevent possible health issues but also increase the culinary value of your hard-earned harvests.
This issue seems to be a very simple one and should be considered common sense, but we can all attest to the fact that the moments right after you've scored the biggest bull or buck of your life things can get a little cloudy. I have witnessed first hand just how excited some folks can get after a successful hunt. Simply surviving the trip back to camp can be a challenge for some. So, to add some clarity to this subject lets review proper field hygiene. Recreating a slaughterhouse environment is still our goal.
In this case we are referring to setting up a clean work environment. An item like a space blanket doubles as a good working area. Lay out your blanket and lift or pull the animal on top. Obviously this will help to keep the dirt, leaves, mud or water off your meat.
Now there are several things to consider when determining on whether or not to skin your animal in the field-
- the outside temperature
- the method in which it is being transported
- the distance you have to travel before it gets into a cold environment
In higher temperatures I will immediately remove the hide to allow the meat to start cooling as fast as possible. If its cold outside and I have a short trip back to camp I'll consider leaving the hide on to protect the meat from possible cross contamination. Every situation is a little different and requires a little thought. It's kind of a trade off - Can you afford to sacrifice a little time at higher internal temperature to avoid the possibility of dirt mud leaves etc? Or, if your trip will be a long one do you risk spoiling your meat by keeping it in the danger zone for too long with the hide on. The "Danger Zone" is between 45 °F - 140°F and is where bacteria grows the quickest. Unfortunately the internal body temperature of most mammals are right in the middle of that zone. This is why understanding what happened when meat is exposed to these volatile temperature ranges is so important. We'll be covering temperature awareness in the next article. So if you do skin your animal. You should cover the meat with breathable game bags for transporting. A cotton or poly material game bag will allow the moisture and heat to escape while protecting the meat from foreign matter and insects.
Possible contributors to cross contamination
Hair/Hide – The problem really isn’t the hide or the hair but what’s riding along. As we know the animals that we pursue rely greatly on scent. The manner to which they achieve this scent varies with season but include – urine, feces and glandular secretions, not to mention mud, dirt, sap and whatever is prevalent in their environments. Obviously these are not things we want on our meat. If you are removing the hide keep the meat from touching it. If you touch it with your hands DON’T handle the meat unless you have a CLEAN pare of gloves or have washed your hands thoroughly.
Internal Fluids – There are many fluids and bi-products located in the internal structure of an animal, most of which aren’t very good for your meat. You should avoid cutting in to, puncturing or dispersing these fluids or bi product on any part of your meat. They will have a lasting effect on the quality of your meat and are a big culprit in causing “gamey” meat. If you find you have possible contaminants while cleaning your animal you should wipe it off and dry it with a clean cloth or towel. I don’t recommend rinsing it out with water because that only spreads the contaminants throughout the cavity of your animal. The combination of water (moisture) and microorganisms WILL rapidly deteriorate the palatability of your meat. Drying out the meat will give you the greatest chance of recovering a high quality product.
Hand to Meat Contact – Once the hide and the internal organs are removed we need to deal with the meat. This requires handling and touching and if our hands are contaminated with the above mentioned items your meat will be contaminated by what's on your hands.
Added Water/Moisture – Unless you're in a controlled environment, like a walk in refrigerator with a good fan to remove excess humidity and moisture be careful when dealing with water on your meat. The combination of added moisture and warm temperature is a haven for bacterial growth and meat spoilage. Taking your carcass down to the river to wash it out will likely do more damage to the quality of the meat than if you simply wiped it off. First you don't really know what's in the water your cleaning your meat with. (Giardia is present in even the clearest running stream or creek. Feces and urine from domestic cattle and sheep are always a concern even in the deepest forest.) Plus, you'll be spreading whatever impurities your trying to remove over the entire carcass. "Keep it dry and keep it clean".
AIDS
Latex Gloves (multiple) - Change your gloves as often as needed…they aren't that costly
Baby Wipes - These are great when you don't have water to clean your hands. I recommend the unscented varieties. They are also great when laid over a lantern in the morning when you want to knock the sleep off your face.
Space Blanket - These make a great lightweight tarp to work on
Rope or parachute cord - to hang meat once it is removed from the carcass
Breathable Game Bags - Protects your meat from dirt, insects, while allowing the meat to cool and dry.
LINK III
“The BIG Chill”
Temperature Awareness
In the food industry there’s a term called “the Danger Zone”. This refers to a temperature range of 45°F - 140°F. Meat (food products) left in this zone for extended periods of time are subject to rapid bacterial growth, with declining culinary value. Unfortunately, the internal body temperature of all the fur/feather-baring animals we pursue are in the middle of this dangerous area. It is very important to do everything you can to remove the internal temperature of your wild game meat as soon as possible.
The biological structure of an animal’s anatomy is designed to maintain its body temperature, especially around the internal organs. This is why the forequarter and neck areas are the first to spoil. The natural insulation of multiple layers of meat, bone & hide is what allows this animal to survive the extreme cold winter temperatures, but it’s also the reason why it’s subject to spoilage. Spoilage occurs when the internal temperature is not allowed to escape and the internal temperatures remain in the “danger zone” for too long. According to the Department of Public Health, you have 2 hours to get the temperature down to 70°F and another 4 hours to get it below 40°F.
An open-air environment is best to dissipate the internal temperature of a piece of meat. Air circulation is very critical in the removal of this temperature. Even the slightest breeze or air movement will help chill the meat and assist in getting it out of the danger zone.
Anything that traps the internal heat of a piece of meat is not recommended. Items like plastic bags and even coolers can trap the air around the meat and act as an insulator. Remember a cooler really isn’t a cooler, it’s an insulator. If there’s no place for the heat to escape it will maintain in the danger zone for a very long time even if it’s packed with plenty of ice.
AIDS
- Always use breathable game bags to store your meat, they allow both the heat and the moisture to escape. The combination of high temperature and moisture is a recipe for disaster.
- Use the Wind/Shade/Slopes to create drafts to your advantage when selecting a meat pole
- Preserve Coldness – Once your meat has chilled down during the night you now want to maintain that internal temperature. Just as with the cooler, a sleeping bag doesn’t just keep you warm. It’s an insulator and it doesn’t care if it insulates warm or cold. Wrap your cold carcass with an extra sleeping bag to maintain its cold temperature during the heat of the day.
- Self-inflicted Hypothermia – Just as wetness against your body will rob it of its warmth, a thin layer of water in combination with wind will help displace temperature of your meat.
LINK IV
“Dry Aging” Wild Game Meat
"The single most important aspect in maximizing the potential of your wild game meat"
We need to understand that most wild birds and big game animals are the equivalent of Olympic athletes. They fly thousands of miles during migration, or run up and down 10,000-foot mountains for a living. Mature game animals are usually tremendous physical specimens. The only way to break down the structure of their muscles and make the meat tender, without resorting to meat hammers and artificial tenderizing agents is to give nature time to do its work, at temperatures that discourage bacterial activity. This whole process is referred to as “Dry Aging.”
“Dry aging is nothing more than a dehydration and decaying process that basically breaks down the fiber structure of those highly developed muscle tissues.”
The objective is to remove as much of the capillary blood as possible. This is the blood found in muscles and is basically the broken down bi-product of what that animal has consumed. The body filters all the nutrients from these food products and is carried in this capillary blood. So when you harvest that big old mule deer buck that has been feeding on sage and bitter brush for the past six years those bi products are very noticeable in the aggressive flavor of that meat. Well many folks want to soak that meat in some ungodly concoction so the good stuff goes in and the bad goes out. Well that simply doesn’t work. Yes, you can add enough culinary band-aides to cover up just about anything. But then you never really experience the fabulous potential of properly handled wild game meat.
I guarantee if you try dry aging you’ll never go back.
Dry Aging is nothing more than the removal of the internal moisture and capillary blood from your meat. Without these liquid properties the tough fiber structure of these highly developed muscles simply break down. You can check to see if your meat has been aged long enough by squeezing the meat with your fingers. A properly aged piece of meat will yield to the pressure of your fingers, One that hasn’t been aged will bounce back like a rubber ball. Also the color of the meat will go from eggplant purple (fully saturated) to the color of veal (blood removed). Dry Aging gives you a two-fold benefit – it tenderizes the meat and removes the aggressive flavors that are present in the capillary blood. This process can be done at any time whether your hanging quarters or racking individual muscles on a stainless steel rack in your frig. And it can be done before or after the meat has been frozen.
DRY AGING TIME LINE
THIS IS Always DONE UNDER REFRIGERATION, At temperatures below 40°F (Frozen meat products are not dry aging)
These birds have been plucked and eviscerated with the internal cavity wiped clean. You can initiate drying from a fresh state as well as after it has defrosted from the freezer. These time lines start when the meat is completely defrosted.
Dry Aging breasted out birds without any skin/bones to slow the drying process DO NOT APPLY to this time line. You can dry age those pieces of meat to a certain degree BUT since the meat will dry out too quickly, you will loose a great deal of meat in the process. This is a slow and gradual process. You get out what you put in. Breasting is a fast and easy way to avoid plucking and cleaning but like most shortcuts comes with a price. If you do have some breasts like the ones below try placing a dry (lint-free) towel over the meat. This will slow the evaporation process down a bit and extend the time you can dry out those tough fibrous tissues.
UPLAND BIRDS Quail 1 day Chukar/Partridge 2 days Grouse 2-3 days Pheasant 2-3 days Wild Turkey 3-4 days
These are recommended times for whole birds with the skin attached. The skin plays a vital role in slowing down the evaporation process. As I stated before Dry Aging needs to be a slow and gradual process. If the meat dries out too fast then you aren’t accomplishing your goal of breaking down the fiber structure. You see, those little tough fibers need time to breakdown as they are drying.
Planted birds require a little less time, as their muscle structure isn’t so developed.
RED MEAT BIRDS Doves 1 day Band-tailed pigeons 1-2 days Teal (sm. ducks) 1-2 days Widgeon (med. ducks) 2-4 days Sprig/Mallards (lg. ducks) 4-7 days Specks/Snow Geese 7-10 days Honkers* 10-14 days
* Aging these very tough birds for this long will give you an incredible tender result. Once aged bone-out the breasts and treat as though they were a tender steak. Cook quickly and rare. Save the legs for chili, stew or sausage. You won’t believe how tender they can be if you have the patients! Always slice across the grain.
LARGE GAME ANIMALS Elk, Moose (quarters) 14 days Elk, Moose (muscle groups, i.e. top sirloin) 7-10 days Deer, Caribou, Sheep, Antelope (quarters) 10 days Deer, Caribou, Sheep, Antelope (muscle groups) 7-10 days Wild Boar (quarters) 8 days Wild Boar (muscle groups) 4-8 days Bear** 4-8 days
If you have your meat already cut into steaks the same approach applies as with the breast situation. The meat will dry out too quickly. If you have no choice at this point you can dry age your steaks for a day or two and it will help. It just won’t have the chance to get to its full potential. You’ll know better next time.
** Dealing with bear meat can be a little tricky. If the bear is consuming garbage as a source of its diet it could be subject to parasites, viruses and microorganisms that can be harmful to human consumption. Please be careful when dealing with bear meat. I would recommend cooking bear meat thoroughly (above 165° F) before eating. This isn’t always the case but its better to be safe than sorry.
Even your ground meat will benefit greatly from being placed in a colander in a bowl, covered and left in the frig. Overnight. The amount of blood that comes out will blow you away. You won’t have to deal with gray hamburgers anymore.
Don't blame the animal if your meat is tough...your meat is just TOO fresh!
LINK V
The Freezing/Defrosting Dilemma
Over the last two decades I’ve been asked to do ALOT of volunteer/donated fund raising events for wildlife habitat organizations (over $120,000.00 raised for wildlife). A figure I am very proud of but that’s another story. In doing these fundraiser dinners and dealing with donated meat products I’ve found that many of us don’t take the time to properly care for the treasure’s buried in our freezers. With the hunt and meat pre-care over it’s very easy to fall short when it comes to properly packaging and storing our meat. These little chunks of happiness will tell their story once they are removed.
“You get OUT - what you put it IN.”
In my opinion the most efficient freezers are chest freezers. Their top opening mechanism allows them to retain a great deal of coldness even when the door is open.
Problem Areas-
Frost Free Freezers – Although, very efficient when it comes to not collecting frost, they play a big part in collecting freezer burn. These units go through a very slight heating cycle to remove the moisture and frost that accumulates. Each time this happens a microscopic part of our meat defrosts. This may not seem substantial but if you count the number of cycles a freezer goes through over a year or two it’s enough to purge the moisture out of your frozen meat. Hence freezer-burn. This is more likely to happen in areas that are loosely wrapped. Double Wrapping and vacuum bags will help eliminate air gaps. This is where freezer burn is most likely to occur.
Slow Defrosting Challenge –
Today’s world runs at a very hectic pace. Most of us don’t think about what we are having for dinner until we get hungry. Throwing that frozen block of meat on the counter before you head to work is a perfect way to destroy the natural integrity of your meat. And an easy way to breakdown the chain in your culinary “links of success.”
Here’s what happens to that frozen piece of meat as it sits on your counter top-
The difference between a freezer, 10°F or less and the counter top 70°F is pretty substantial, at least in the world of moisture molecules. Every piece of meat has these little cells that hold in its natural moisture. Upon freezing these cells expand. As they expand the outer cell wall becomes very fragile. Picture a balloon when its blown up. When they go from a 10°F freezer to a 70°F counter top, it defrosts so quickly that the fragile cells can’t hold their own weight and burst. That explains the puddle of mystery liquid on the plate.
To stop this purging we need to take some very simple steps. Mostly, become a little more organized. Take your meat from the freezer and place it into the refrigerator. Going from a 10°F freezer to a 35°F refrigerator is only 25°F difference. Now, those cells are defrosting much slower, and can actually go back to their original shape and hold the weight of their internal moisture. This assures that the piece of meat you end up with is as close to the one that you put into the freezer. It should take approximately two – three days for a given block of meat to defrost under these conditions. Be patient and organized and give that meat a chance to “be all that it can be.”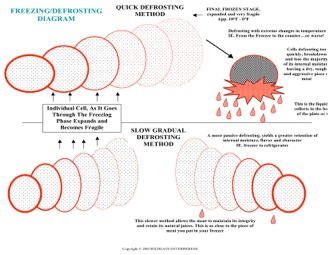
Proper Labeling –
Avoid the mystery blocks of frozen matter in the bottom of your freezer. Label each piece with species, state, date and exact cut - eye round, top sirloin, back-straps etc. Leave the guessing to picking those winning lottery numbers, not selecting your next meal.
LINK VI
“Know your Cuts of Meat,”
as David Letterman would say!
For late-night TV it’s a funny bit - But there’s nothing funny about having your friends or family over and you think you’re serving a nice juicy tender steak only to find out it’s a bottom or eye round. These cuts would be better suited as a slow cooked pot roast, stew or chili. I’m sure this scenario has played out for just about everyone who has a freezer full of wild game meat. The unfortunate result is your guests have just struggled through a tough and dry piece of game meat and will base their opinion on this experience. Because they have so much respect for you and your culinary wisdom they would never hold you accountable and the burden inevitably falls to the poor animal. I can’t tell you how man times I’ve heard, “I love elk but I don’t eat antelope or deer or duck.” I think mishandled or in this case misidentified meat plays a big roll in creating negative opinions of wild game meat.
Knowing the muscle groups of a game animal will eliminate these pitfalls. Our WildEats Hunters Meat Map identifies all the muscle groups in the anatomy of a big game animal and what are the best cooking techniques for each cut.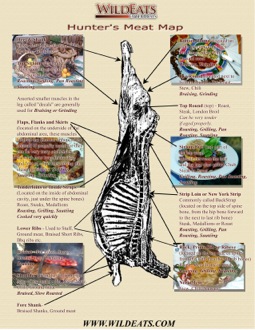
A key cooking rule when dealing with wild game meat - the tender cuts need to be cooked as quickly as possible and the tough cuts benefit from very slow moist cooking techniques such as braising.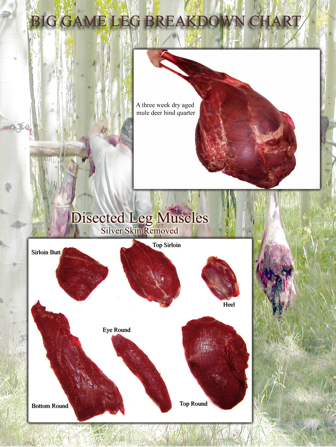
The leg of a large game animal is made up of seven muscles-
Tender Cuts
Top Round
Top Sirloin
Sirloin Butt
Tougher Cuts
Eye Round
Bottom Round
Heel
Shank (not shown)
(Insert Skeletal Breakdown)
Knowing your way around the anatomy of a big game animal gives you the confidence to correctly identify all those tasty morsels. This is very similar to studying a Topo map and finding those far off northern slopes that hold seldom seen trophies. Be sure and show off your latest trophy on your dining room table this weekend.